
Veeam Free Linux Agent Install on Centos 7

If you are a junior admin that works with Vmware or Azure, learning Veeam backups can elevate your skills and value.

This post will walk through the steps of setting up the free Linux backup agent on a Centos 7 virtual machine.

Step 1: Lay the Foundation


Run uname -r and take note of the kernel version.
Make sure you yum install kernel-devel which matches your kernel version

In order to install libudev dependency I used yum install systemd-devel
For libfuse dependency I used yum install fuse-libs

  • yum install syslinux
  • yum install epel-release
  • yum update -y or yum makecache
  • yum install dkms (If you cant find this package check your epel realease)

*Do Not Skip Dependencies* unless they do not apply to your operating system. Footnotes will guide you in the documentation.


Default port used for communication with the Veeam backup server
  • firewall-cmd --permanent --add-port=10006/tcp

For NFS or SMB please refer to the documentation.


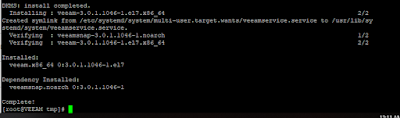
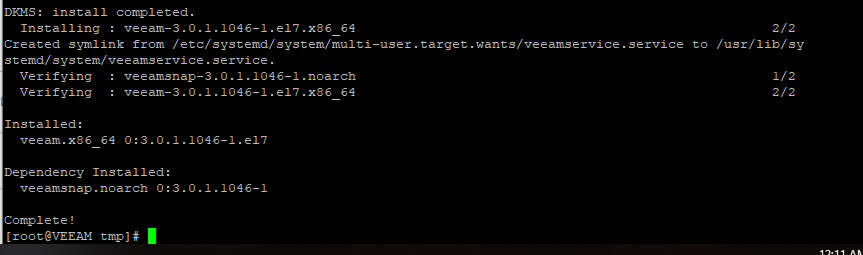
Step 3: Agent Install

yum install mokutil
mokutil --import veeamsnap-ueficert.crt

  • cd /tmp 
  • wget https://download2.veeam.com/veeam-release-el7-1.0.7-1.x86_64.rpm
  • rpm -ivh ./veeam-release* && yum check-update

Finally Steps:

  • yum update veeam
  • rpm -e --nodeps dkms veeamsnap 
  • yum install kmod-veeamsnap*
You can now proceed to setup your Backup Repository and setup your backup jobs.

Comments

Popular posts from this blog

Repo Ready

In order to set up your Base Channel you will need some gpg key information from the server. I used the following commands to acquire this information: [root@sw ~]# cd /etc/pki/rpm-gpg/ [root@sw rpm-gpg]# gpg --with-fingerprint RPM-GPG-KEY-CentOS-7 In order to set up the repository for the base channel I used: http://www.gtlib.gatech.edu/pub/centos/7.6.1810/os/x86_64/ Lastly, trying to sync repositories and packages can be extremely taxing on system resources; especially if done via the web GUI. I think this is because it also kicks off some java process as well as the sync. As a work around, close the web GUI completely, and use the following command via CLI: spacewalk-repo-sync -c Insert-Channel-Label Overall I would prefer leaner server provisioning software. My future projects will have less to do with deployments and have more focus on web operations. List of future interest: Nginx Haproxy Varnish Python Jenkins

Groovy Gradle Version 5.3.1

Gradle is an open-source build automation tool focused on flexibility and performance. It has a mature offering of libraries,plugins, and testing. Gradle build scripts are written using a Groovy or Kotlin DSL. Although this post focuses on installation, I also wanted to provide some links for extra value: Plugins can be found @ https://plugins.gradle.org/ Netflix's Glisten is an ease of use Groovy library for building JVM applications with Amazon Simple Workflow Service (SWF) check out https://github.com/Netflix/glisten Lastly, Gradle auto completion can be found @ https://github.com/gradle/gradle-completion Installing Gradle Version 5.3.1 yum makecache yum install unzip yum install bzip2 yum remove java yum install java-1.8.0-openjdk // Confirm Intalled correctly java -version wget https://services.gradle.org/distributions/gradle-5.3.1-bin.zip -P /tmp/ mkdir /opt/gradle unzip -d /opt/gradle /tmp/gradle-5.3.1-bin.zip rm /tmp/gradle-5.3.1-bin.zip vim /etc/pro